Chain Drop on Tern GSD S10 (and other mid-drive e-bikes)
Many riders of the first generation Tern GSD S10 have experienced the chain dropping off the chainring inside the chainguard near the drive unit. We get a lot of inquiries about what to do when this happens and what can be done to prevent this.
To start, just a note that every bike is going to need repair, and the fact that the GSD has a specific manifestation of wear that is predictable enough for me to write a thousand words about it doesn’t mean this is a worse problem than the ways other bicycles wear over time. This problem is also not unique to the GSD and many of these observations are the same for other bicycles experiencing similar symptoms, especially other mid-drive electric-assist bicycles.
But, in the interest of sharing of knowledge, a few field notes from the service department on what we have learned from the past few years of servicing this bike and working on this problem:
How can I put my chain back on at home (or on the side of the road)?
While a professional mechanic can help here, I do think even the most mechanically timid can learn to rescue themself from this situation to get their GSD rolling again. Some tips:

Required Tools:
4mm allen key: available as part of bike-specific multi-tools such as this one shown in the picture or this one from Tern. You can purchase such a tool at your local bike shop (like G&O!), at a hardware store that carries metric tools, or check your pile of leftover IKEA tools
8mm combination or open-end box wrench: available as a bike specific tool from your local bike shop, such this one, or at a hardware store that carries metric tools
Suggested Tools:
disposable gloves: you are going to be touching your dirty chain directly (and it's a nice thing to pack in your bike travel tool bag for many circumstances)
flashlight: your phone will do the trick nicely, or headlamp
Steps:
Park your bicycle on the kickstand.
Turn the assist off, and we recommend powering the whole system down. (You’re going to be getting your hands up in the drivetrain, so for extra safety, it might be wise to go ahead and remove the whole battery.)
If possible, shift into the highest/hardest gear, which is the 10th/smallest cog. This is to help get more slack in the chain to make it easier for you.
If possible, reach back and flip the clutch off. It is a little light-gray tab on the derailleur you can rotate clockwise 90 degrees into the off position. (If your bags or cargo are in the way, it's okay; you’ll just be fighting against it trying to keep tension on the chain. More on the clutch later.)

It may be worth trying to squeeze your hand inside the chainguard to get the chain back on. However, it's a cramped awkward space, and the chainguard blocks your view, so I usually recommend carrying the tools to be able to partially remove the chainguard to have better sight and access.
1. Sitting on the ground next to and looking at the driveside of your bicycle, that is, the side with the chain (the rider’s right). Follow the tail of the chainguard toward the back of the bicycle until you find the single bolt and nut holding it in place.
2. Use a 4mm allen key and an 8mm box wrench on the other side to fully remove that nut, washer, and bolt. Put hardware aside for safe keeping.
3. Rotate the chainguard clockwise, with the center of the chainring in the front as the axis of rotation. It slides on tracks coming out of the plastic motor shell. It’s okay to rotate it so it fully slides off, as much as you need to be able to get your hands in to get the chain back on.


4. Pick up the chain and guide it to be seated on top of the chainring. Then, to get the chain seated on the bottom of the chainring, you should be able to pedal forward carefully, keeping your fingers clear. Pedal another full rotation to ensure the chain really is properly on the chainring.
5. Reinstall the chainguard. If it's fully off the tracks, carefully reseat it on the tracks.
6. Reinstall that bolt at the tail of the chainguard, and flip the clutch of the derailleur back on.
You should be good to go!


Why did this happen?
There are a combination of factors at play, many of which are endemic to the 1x (pronounced “one-by”) drivetrain. 1x systems are now found in nearly all kinds of bicycles, but remain especially prominent in mountain bikes, cyclocross, fat bikes, and mid-drive electric bikes. The name 1x indicates only one chainring in the front, but many cogs in the rear. All Bosch-equipped electric-assist bicycles all have a 1x drivetrain, as do many other e-bike systems. The first generation GSD specifically, has a single 20-tooth chainring attached to the drive unit.
The short answer is, without a front derailleur, a 1x drivetrain has less tolerance for wear in the drivetrain, poor alignment of the chain with respect to the chainring, and moments of reduced chain tension from bouncing, slapping, back-pedaling, etc. These are all fairly normal riding experiences, and the front derailleur keeps the chain on throughout. But on a 1x, as the chain gets more play in it, has a looser fit on the teeth of the chainring, and/or is being pulled to one side, and then when it catches a moment of slack, it can become dislodged and fall off.
If it's happening frequently, it may be worth considering options to try to increase the chain retention on your bicycle.
How can I try to prevent this from happening?
There are a few strategies to increase chain retention in this system:
Replace the chain more often: For most, the chain dropping is an indication that it is time to replace the chain (and at that point, chainring). By replacing the chain more frequently in the future, you can prevent the chainring from getting too worn, and avoid stranding you.
Ride with the clutch on: I’m very excited to say the rear derailleur (Shimano RD-M6000) on the GSD S10 has a clutch, which when engaged, provides a strong resistance to the derailleur cage being pulled forward, preventing slack from accumulating in the chain. While some may feel the clutch can make the shifting feel “clunkier”, the trade-off is worth it for retention. On other bicycles experiencing similar chain drop, upgrading to a clutch derailleur can help.
Check the wear and alignment on the idler pulley: the idler pulley in the lower section of the chain can be adjusted for alignment, and should be replaced regularly as the soft rubber wears out unevenly.
Upgrade the chainring: many high-end 1x-specific chainrings have specially designed teeth profiles that are deeper cut, and alternate having one wider tooth, to have more contact on the outer plate pairs on the chain. These are commonly referred to as “narrow-wide”, or by the various brands’ proprietary names: X-Sync, droptooth, Drop-Stop. The GSD chainring has a special offset that limits replacement options; however, we have found the narrow-wide chainring Yuba made for their second generation Spicy Curry cargo bike has the same offset and is a great upgrade option for the GSD to increase tooth retention. We try to keep that chainring in stock, or any local Yuba dealer would be able to order it for you. [EDIT Sep 2023: We can sadly no longer get the Spicy Curry cogs. There is an 18t SRAM cog that works, but has a cost of lowering the overall gear range.]
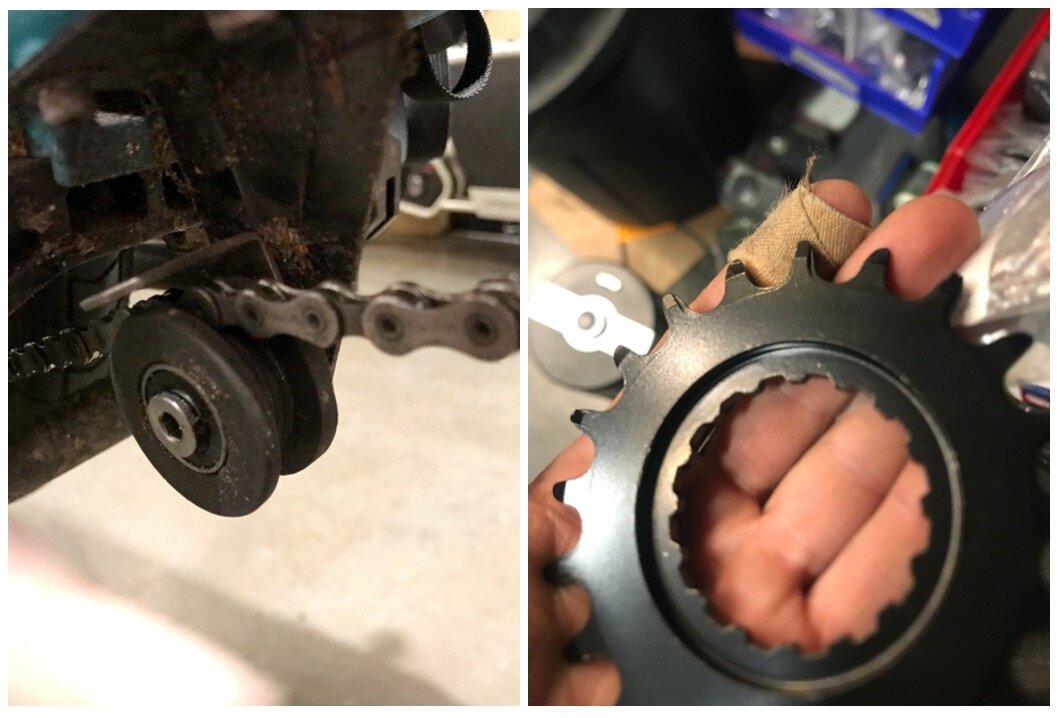
Left: idler pulley helps with chainline, as well as clearance on kickstand and tire, but is also a part that wears over time. Right: Yuba narrow-wide cog that is a good upgrade option for the GSD S10.
What is the future of this issue with the GSD?
This discussion so far has been focused on the issue as seen in the first generation GSD S10 (the one, somewhat confusingly, with the Bosch Gen2 drive unit), with the 20-tooth front chainring.
I am excited to say the new second generation GSD S10s (both the base S10 and S10 LX models) are unlikely to experience this for two improvements:
Bigger chainring: Still coming stock with the same high-end clutch-equipped derailleur and a tensioner pulley, the new GSD now also comes with the Bosch Gen4 drive units and a front chainring of 52t. Bigger chainring, means more chain wrap around it, means less likely to become derailed.
Narrow-wide tooth profile: in addition to having more engagement, the stock chainring comes with the narrow-wide 1x-specific tooth profile, further increasing engagement.
It’s always possible to wear the drivetrain out enough to start losing the chain on any system, but I am optimistic that with the new design it will take much longer to reach that point. A rider who is getting regular service for their Gen2 GSD is unlikely to experience it.
Questions? Do you have anything you want to see covered? Let us know, or give us a call!